- Table of Contents
- 1. Edit host netgroups
1. Edit host netgroups
A "host netgroup" (hence "netgroup") can be compared to a guest list when you are inviting somebody to a party. You have made the guest list to avoid unwanted guests, for instance crooks. In a computer network, the guests are a bit different. They are "Internet hosts", e.g. printers, thin client servers or workstations. If these hosts are on the guest list, they are welcome to do their task on the network. If they are not, they are automaticly kept out by the door-keeper.
A netgroup thus keeps track of the guests, or "hosts" in "Internet lingo". It can also keep track of other netgroups, and this adds to simplified administration of e.g. access to the Internet or to a file server. It is much easier to administrate groups of hosts than stating every single host everywhere.
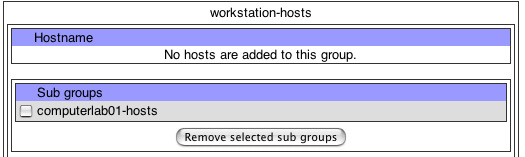
You have to use netgroups correctly to avoid extra administration. It is useless to have for example a netgroup named "workstation-hosts" with 250 different hosts in it. It is better to use sub groups. The workstations could be grouped into "computerlab01-hosts", "computerlab02-hosts" and "teachers-hosts", and these could be subgroups to another netgroup named "workstation-hosts".
In the future skolelinux will probably use netgroups for other various tasks. Today they are used to prevent unwanted guests to the file server.
1.1. The netgroup module
To edit netgroups, you have to use Webmin. The module is named "Edit host netgroups" and is found under the "System"-tab.

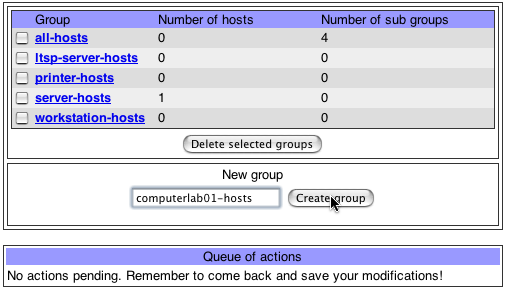
On a newly installed Skolelinux-tjener, the following netgroups are added:
- ltsp-server-hosts
All the thin client servers in the network.
- printer-hosts
All the printers in the network.
- server-hosts
All the servers in the network. This is primarily "tjener", but if you move e.g. the backup service to another host, add that host here.
- workstation-hosts
All the groups containing workstations, or all the workstations in a small network.
- all-hosts
This group contains no hosts, but all other netgroups.
 | Naming conventions |
|---|---|
Note how all the netgroup names end with "-hosts". This is to make it easier to distinct netgroups from other groups where it should become necessary. We suggest you use the same naming convention. |
1.2. Adding hosts to a netgroup
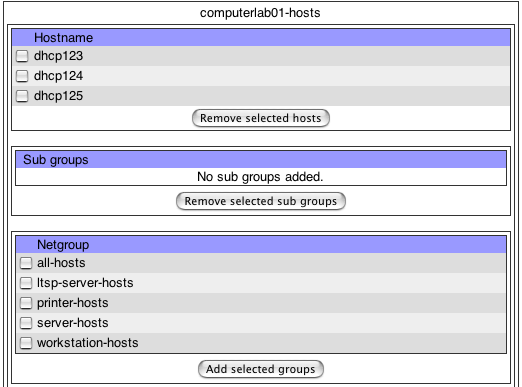
In the overview, clik on the netgroup you want to make changes to. A new window appears, showing hosts, sub groups and netgroups available to add as sub groups and an area for adding new hosts.

Enter the name on a line of its own for every host you want to add to the netgroup.
If you check the "Verify validity of hosts"-box, every hostname will be tested and only those valid will be added. Note that this may slow down the process.
If you check the "Make sure the hostnames can be used by the file server"-box, every hostname will be tested and only those usable to the file server will be added. Note that this may slow down the process.
Click on "Add" to add the entered hosts to the netgroup. You will see the same page, now with the new hosts in the list.
Click on "Back" when you are finnished editing the netgroup. Remember to save your changes.
1.3. Saving changes
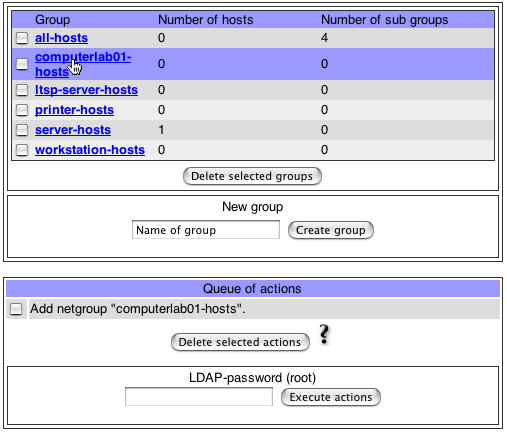
Return to the overview when you are finnished making your changes. Notice the actions in the action queue. When you are done, enter your LDAP-password and click on "Execute actions". The changes are sent to the catalogue server, and you get a new window showing the replies from the server. For every successfull action, the server replies "Success".
You can remove actions you regret or made by mistake. Select the actions you want to remove from the queue and click on "Delete selected actions". Actions depending on those removed will not be executed. If you for example remove the action "Add netgroup 'computerlab01-hosts'", the action "Add host(s) (dhcp123, dhcp124, dhcp125)" will not be executed.

1.4. Adding a new netgroup
Enter the name of the new netgroup in the "Name of group"-textfield in the "New group"-area and click on "Create group". The name has to be between 9 and 40 characters and contain only alphanumeric characters and hyphens.
The new netgroup is now listed together with the other groups.
1.5. Adding a subgroup
In the overview, click on the group you want to add subgroups to. If you want to add "computerlab01-hosts" as a subgroup to "workstation-hosts", click on "workstation-hosts".
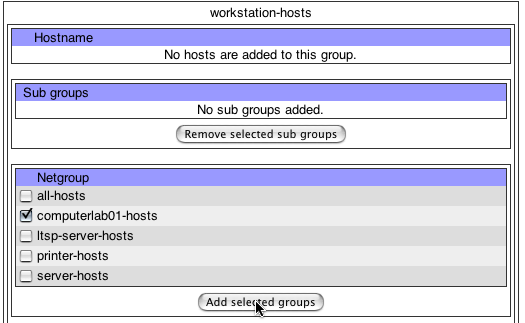
Select the group you want to add as a sub group and click on "Add selected groups". The sub groups are now listed as a sub group.
Remember to save your changes.
1.6. Deleting a netgroup
In the overview, select the netgroups you want to remove and click on "Delete selected groups".
Remember to save your changes.
1.7. Removing hosts from a netgroup
In the overview, click on the group you want to change. Select the hosts you want to remove and click on "Remove selected hosts".
Remember to save your changes.
1.8. Removing a subgroup
In the overview, click on the group you want to change. Select the sub groups you want to remove and click on "Remove selected sub groups".
Remember to save your changes.